我们在使用谷歌或者火狐浏览器浏览网站的时候,经常会在网址的前面看到一把锁的标志,或者看到提示“不安全”三个字。这把锁说明了该网站开启了 HTTPS 访问,而不安全则说明了当前没有通过HTTPS访问网站。HTTPS 是 HTTP 的安全版本,可以看成是安装了 SSL 证书的 HTTP。HTTPS 意味着浏览器和 Web 服务器之间的所有通信都是加密的。
在本教程中,我们将介绍如何在 Ubuntu 20.04 上创建和安装自签名 SSL 证书。自签名证书是未经证书颁发机构 (CA) 签名的证书,此证书具有与受信任证书相同的加密级别。
第 1 步 – 通过 SSH 登录云服务器
首先,登录到自己的云服务器。登录到 Ubuntu 20.04 服务器后,运行以下命令,更新软件包。
apt-get update -y第 2 步 – 安装 Apache 服务器
在开始之前,必须在服务器上安装 Apache 网络服务器。如果已安装请跳过,如果尚未安装,可以使用以下命令安装:
apt-get install apache2 openssl -y安装 Apache 后,继续下一步。
第 3 步 – 生成自签名证书
SSL 使用公钥和私钥。私钥保留在服务器上,用于加密内容,而公钥用于解密内容并在客户端之间共享。
首先,需要为域名生成私钥和证书签名请求 (CSR)。可以使用以下命令生成它:
openssl req -nodes -newkey rsa:2048 -keyout /etc/ssl/private/private.key -out
/etc/ssl/private/request.csr
将提示提供证书信息,包括通用名称、组织、城市、州和国家/地区,如下所示:
 Generating a RSA private key
 ………………………………………………………………..+++++
 ………………………………………………………………………………..+++++
 writing new private key to '/etc/ssl/private/private.key'
 You are about to be asked to enter information that will be incorporated
 into your certificate request.
 What you are about to enter is what is called a Distinguished Name or a DN.
 There are quite a few fields but you can leave some blank
 For some fields there will be a default value,
 If you enter '.', the field will be left blank.
 Country Name (2 letter code) [AU]:US
 State or Province Name (full name) [Some-State]:Newyork
 Locality Name (eg, city) []:Newyork
 Organization Name (eg, company) [Internet Widgits Pty Ltd]:Atlantic
 Organizational Unit Name (eg, section) []:IT
 Common Name (e.g. server FQDN or YOUR name) []:Atlantic
 Email Address []:admin@example.com
 Please enter the following 'extra' attributes
 to be sent with your certificate request
 A challenge password []:
 An optional company name []:
生成 request.csr 后,可以使用以下命令生成 SSL 证书:
openssl x509 -in /etc/ssl/private/request.csr -out /etc/ssl/private/certificate.crt -req -signkey
/etc/ssl/private/private.key -days 365
应该会得到以下输出:
Signature ok
subject=C = US, ST = Newyork, L = Newyork, O = Atlantic, OU = IT, CN = Atlantic,
emailAddress = admin@example.com
Getting Private key
此时,证书 (certificate.crt) 和密钥 (private.key) 文件就已经准备好了。
第 4 步 – 配置 Apache 使用 SSL
现在,需要配置 Apache 使用在上一步中生成的证书。
首先,打开 Apache 默认 SSL 配置文件:
nano /etc/apache2/sites-available/default-ssl.conf定义您的域名和 SSL 证书,如下所示:
 ServerAdmin admin@example.com
 ServerName your-server-ip
 DocumentRoot /var/www/html
 ErrorLog ${APACHE_LOG_DIR}/error.log
 CustomLog ${APACHE_LOG_DIR}/access.log combined
 SSLEngine on
 SSLCertificateFile /etc/ssl/private/certificate.crt
 SSLCertificateKeyFile /etc/ssl/private/private.key
 SSLOptions +StdEnvVars

 SSLOptions +StdEnvVars
保存并关闭文件,然后使用以下命令启用虚拟主机文件(替换为自己的虚拟主机配置文件):
a2ensite default-ssl.conf接下来,打开 Apache 默认的虚拟主机配置文件,如下图:
nano /etc/apache2/sites-available/000-default.conf定义您的域名并添加重定向指令,将所有流量指向该站点的 SSL 版本:
 ServerAdmin admin@example.com
 ServerName your-server-ip
 DocumentRoot /var/www/html
 ErrorLog ${APACHE_LOG_DIR}/error.log
 CustomLog ${APACHE_LOG_DIR}/access.log combined
 Redirect "/" "https://your-server-ip/
接下来,使用以下命令启用 SSL 和 Headers 模块:
a2enmod ssl
a2enmod headers
最后,重新加载 Apache 服务使更改生效:
systemctl reload apache2此时, Apache 服务器已被配置为使用 SSL 证书。
第 5 步 – 验证 SSL 服务器
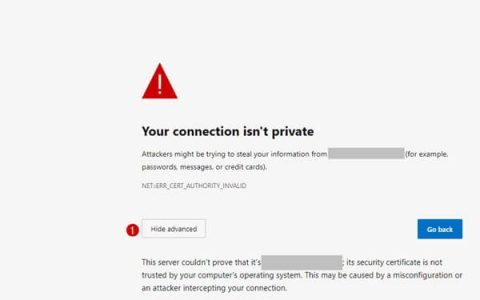
现在,打开浏览器并访问 URL https://your-server-ip。将被重定向到警告页面:

这是因为您的证书未由受信任的证书颁发机构签名。这是正常的,忽略它并单击继续,将被重定向到 Apache 默认页面:

在浏览器地址栏中,将看到带有“不安全”通知的锁。这意味着证书未经过验证,但仍在加密您的连接。
作者:牛奇网,本站文章均为辛苦原创,在此严正声明,本站内容严禁采集转载,面斥不雅请好自为之,本文网址:https://www.niuqi360.com/linux/create-and-install-a-self-signed-ssl-certificate-on-ubuntu/